Friday, November 23, 2018

Some Things on My Christmas List

I can't believe the holidays are upon us already. It feels like they just ended, and now they are back again!!

For those who celebrated, I hope you had a wonderful Thanksgiving with family and friends!!

I have my Christmas wishlist already written up, and there are quite a few baking related items on it.

Here are the baking things I would like to get for Christmas this year:
  • Wilton 8-Piece 3D Figure Modeling Fondant Cake Decorating Tool Set
  • Macarons: Chic and Delicious French Treats by Annie Rigg
  • 2-Pack SIlicone Macaron Baking Mats
  • Wilton 6-Cavity Cake Decorating Icing Bag Stand
  • Wilton 9-Piece Color Swirl 3-Color Piping Bag Coupler
  • Baking All Year Round: Holidays & Special Occasions by Rosanna Pansino
  • The Nerdy Nummies Cookbook: Sweet Treats for the Geek in All of Us by Rosanna Pansino
  • Wilton 40-Piece Letter and Number Fondant Cutters Set
There are several other things on my list, that are not baking-related, but I really hope I get at least one of these baking-related ones.

To those who celebrate, Merry Christmas!!!
To those who celebrate Hannukah, Happy Hannukah!!

Happy holidays to those who celebrate any other holiday!!

Thursday, August 30, 2018

A Long Awaited Update

Man, I seriously need to stop waiting so long betwIeen posts. I feel bad for neglecting this blog for so long!!
So, here is an update from me.

I am doing an internship through my school's baking and pastry program, at a local pie shop. I have been here since April 11th, and I absolutely love it!!

The owners/employees are very nice, and I get to do lots of baking, which is awesome!!

For this internship, I need to complete 240 hours, and once the hours are done, I will be graded on how I did. To do that, my internship advisor (one of the teachers at the school) will come in and talk to the owner about my work, and how they think I did.

I was told on several occasions that I am doing very well, so I am not worried about how this will go.

I am really going to miss this place when I am done, though. I have gotten so used to it, that it is going to be weird not working there anymore.

Once this internship is done (mid October at the latest; I have around 65 hours or so to go, until I finish), I will take the rest of the fall semester off (it has already begun at my school), and then take the last class in the spring.

The last class!! I can't believe I am so close to finishing, and graduating!!! It took sooo long to get to this point, which I didn't think would come so soon, but it is here, and is becoming very real.

I am thinking about taking a trip to New York, next July, once I am done with school, as a treat to myself for doing so well, and for finishing something I have wanted for so long.

I have a pretty good idea of what I want to do while there, and even where I want to stay (hotel/hostel/etc.-wise).

I just have to finish this certificate first, and then I can have some fun. This trip will definitely be worth it, and I really hope I can go on it!!

Tuesday, October 24, 2017

Monster Cupcakes

Wow!! I keep letting this blog go, don't I? I will try and do better!!!

I recently got my first box from the subscription company Foodstirs (you can find out more at their website HERE), and I finally got around to trying it out.

Included in the box were the ingredients and instructions, the cupcake mix, frosting mix, three different coloring packets (pink, blue, and green), a packet of purple sprinkles, a packet of chocolate chips, a pastry bag, and ten cupcake/muffin liners.

It was very easy to follow the steps to make the cupcakes, as well as decorating them.

My decorating skills aren't the best right now, but they turned out pretty well, and tasted great!!!

I am so glad I found out about Foodstirs, and I have already ordered a galaxy donut box, which will be arriving soon!!

Here are some pictures I took, of the process:

The finished product.

The outside of the final product.

Just before I put them in the oven to bake.

The finished product.
 
Like I said, I'm not the best decorator right now, but I hope to be able to perfect my skills in time. Thank you so much to Foodstirs for the opportunity to try your products out, and look forward to making more yummy treats in the future!!!

Thursday, December 15, 2016

Holiday Chocolate Ganache

I saw another recipe I liked, from the local newspaper, and decided to share it on here.

Ingredients
  • 12 ounces quality chocolate
  • 3 tablespoons butter at room temperature
  • 1 1/4 cups heavy whipping cream
  • 2 tablespoons light corn syrup
  • 2 tablespoons vanilla or favorite liqueur
Instructions
  1. Break chocolate into chunks and place in a food processor. Pulse several times to break chocolate into smaller pieces. Add butter to processor. Set aside.
  2. Place heavy cream and corn syrup in sauce pan and heat until just boiling. Pour hot cream mixture through a sieve over chocolate and butter in food processor. Process mixture till the mixture is smooth and "satiny" with no lumps. Scrape down sides of processor.
  3. Add vanilla or liqueur. Process till blended. Use ganache in several ways:
  • Chocolate Dipped Strawberries: Let ganache cool to 86 degrees. Dip clean, dry strawberries into ganache, and place on parchment sheet. Can be rolled in crushed cookies or nuts if desired.
  • Ganache Sandwich Cookies: Make or purchase your favorite firm holiday cookies. Sandwich two cookies together with ganache.
  • Panettone with Ganache: Slice panettone into thirds, pipe ganache on each layer. Drizzle top lightly with ganache.
  • Chocolate tarts: Pour or pipe ganache into tart shells. Let stand at room Temperature to set for two hours or refrigerate for 1 hour. Garnish as desired.
  • Truffles: Refrigerate mixture until firm. Roll pieces into balls and coat with cocoa, nuts or toppings.

Thursday, October 13, 2016

Honey Cake

This recipe was in this past week's edition of one of my local papers. It sounded really good, so I figured I would share it on here.


Honey Cake
 
Cake
3/4 cup butter
1 cup plus 2 tablespoons sugar
2 eggs
1 teaspoon vanilla
1 tablespoon orange juice
1/4 cup plus 2 tablespoons honey
2 cups flour
1 teaspoon baking powder
1 teaspoon baking soda
1/2 teaspoon salt
1 cup sour cream
 
Tres Leches Soak
3 ounces evaporated milk
3 1/2 ounces sweetened condensed milk
3 ounces whole milk
1/4 teaspoon vanilla
 
Cream butter and sugar until light and fluffy. Add eggs, vanilla, orange juice and honey. Scrape sides of bowl while mixing.
 
In a separate bowl, combine flour, baking powder, baking soda and salt. Mix dry ingredients into main mixture in parts, alternating with sour cream. Line a 9x13-inch pan with parchment paper. Pour batter into pan.
 
Bake at 350 degrees for 20 to 30 minutes or until cake tester comes out clean. Cool. Carefully turn cake out of the pan. Peel of parchment paper and return cake to the pan. Poke holes in the cake. Mix together the three milks and vanilla. Pour about one-third of the mixture over the cake. Allow to soak into the cake. Repeat until all the liquid is used.

Tuesday, October 11, 2016

Update: Garde Manger Class

Wow, it's been a long time since I last posted. I will try and do better at posting regularly from now on.

Anyway, I am currently taking a Garde Manger class in school, which is a cold food prep class. The first day of class was August 22, so we've been going for a while now. I know this isn't bakery related, but it's still food, and I figured, why not blog about it here?

Class is on Mondays from 4 to 9:15 pm, and I am enjoying it so far. This last class, we made Monte Cristo sandwiches, Croquette Madame sandwiches, and chicken tamales, and let me tell you, they were SOOOOO GOOD!!!!!

I may just have to make them at home. Although, the Monte Cristo sandwiches is a long process, but I think it is worth it.

So far this semester, we have also made spanakopita, pasta, salads, grilled chicken, pot stickers, samosas, bourek, guacamole, chicken satay, shrimp spring rolls, and bacon wrapped dates. All were very good.

I am looking forward to the rest of the semester, and what all we're going to make.

Saturday, May 14, 2016

Professional Menu Final

Well, my last day of Menu Writing for the spring semester was yesterday. It was an interesting class, and I liked it (and the teacher), but to be honest, I'm glad the semester is over. I need a break from school.

For my Menu Writing final, we had to make a professional menu, and let me tell you, it was a LOT of work!!

Figuring out what I wanted on my menu, how much to price them for, the design (color, how many pages, the type of cover, etc.).....

It was frustrating, to say the least.

It took me forever to figure out the design, and that frustrated me even more, when I printed the menu out.

I had a background on each of the pages, and it didn't print for some reason. It was just the menu items, the name, the picture I put on the back page, and the border. The only thing that was in color was the back page picture.

And I was NOT happy :(

I was finally able to get it properly printed out, the next day at the library. I decided to use colored cardstock, instead of white.

THEN....

While in class last week, while my teacher was talking with each person in the class about their menus and hearing what they were doing for theirs (they weren't talking quietly, so it was kind of hard not to listen to them), I was having second thoughts about how my menu looked.

My original idea was to use paper grocery bags, and glue/tape the menu (printed on cardstock) onto each side, and bind it together with twine. It actually looks kind of cool, even if it doesn't have many pictures.

I went back on my computer class, and did some tweaking to what I already did.

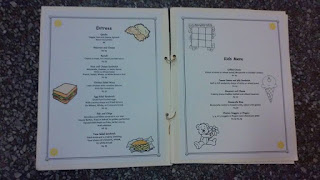
Here's what I had done before editing it:

The back of the menu.

Inside

Inside

Inside

The front
 
 
Pretty simple, plain. Only a couple pictures. Not great, but not bad, either.
 
My teacher suggested I put pictures along with the menu items, to make it more appealing.
 
So, that's what I did.
 
I ran out of paper bags the size I needed, so I used all cardstock for my updated menu. I also used different colors for it as well.
 
My updated Menu:
 
The back

Inside

Inside

Inside


The front
 
Looks a lot better, but still isn't the greatest. But, I am happy with it in general.
 
The only thing I didn't like was having to get up in front of the class, and present my menu to them. I am a shy person, so talking in front of a group of people is not exactly one of my favorite things to do. I'm just glad it's over.
 
My teacher had actually said that she liked my original idea of using the paper grocery bags, and asked why I changed it to cardstock, and I told her I ran out of the bags.
 
I don't know how well I did on it, and in the class overall, but I will find out within the next couple of weeks. Hopefully I passed!!